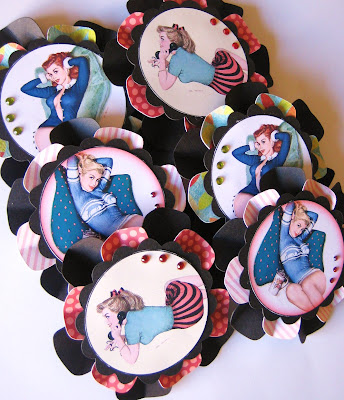
Wanna make some fun, 3D embellishments?
No special glasses required ~ these babies just POP with layers!
Here are the materials needed:
*scissors
*pop up adhesive
*glue gun
*rhinestones
*card stock
*images
First, cut out the images you want to use (you can use digital collages, or even just punch out sections of pretty paper). I cut mine as 2 inch circles.
Next, use your scallop icon in your Storybook cartridge to cut out a black layer 2.5 inches for behind your image.
I used the flower icon (shown below) from the Plantin cartridge to make my flower layers. I cut one about 3.25 inches and then a black layer about 3.75 inches.
When they are cut, simply fold each layer in 1/2 (folding toward you) so that the edges of each flower petal stand up. Do that with both your patterned paper and the black flowers.
Using foam squares, layer the flower sections together.
After hot-gluing your image to your scallop layer, add rhinestones. I heat-set mine with a Tulip heat tool.
Now you can add them to your flowers with foam adhesive.
Simple as that!
These are fabulous to use on scrapbook pages, cards, frames and invitations. They make adorable party favors and cupcake toppers too!
You can check out my listing for these puppies, too, if you'd like to purchase some for yourself.
Enjoy, and happy crafting!
xoxo
Genevieve


No comments:
Post a Comment